
Zero Trust Pipelines with OIDC, Cloudsmith, and GitHub Actions
In CI/CD workflows, leaked credentials pose a significant threat, potentially leading to unauthorized access, data breaches, and system compromises, ultimately disrupting development pipelines and undermining the integrity of software deployment processes.


Today, we're addressing the challenge of moving away from risky long-lived credentials, such as username/password combinations or tokens, and embracing OpenID Connect (OIDC) for enhanced security and manageability.
OIDC is key to building zero-trust pipelines, enhancing the security of CI/CD workflows.
In this blog, we will:
- Outline the security risks with using long-lived credentials.
- Explain how OIDC works.
- Provide a step-by-step GitHub Actions workflow that builds and pushes a package to Cloudsmith using OIDC for authentication.
Security Risks with Long-Lived Credentials:
Traditionally, CI/CD pipelines have relied on tokens or username/password combinations for accessing cloud services, managing resources, and deploying software. However, these long-lived credentials pose significant risks to security and manageability.
These risks include:
- Leakage: Any credential can leak, and it might remain unchanged for months or even years before detection.
- Expiration Challenges: Setting static credentials to expire is good practice, but managing their renewal across various workflows can be error-prone, leading to potential breakages.
- Reuse: Reusing credentials across multiple environments or workflows is a common practice, further exacerbating security risks.
Case Study: Financial Times
We held a webinar with Rob Godfrey, Senior Technical Architect at Financial Times where he shared insights from a critical incident in Jan 2023. Following a breach, Rob's team had to spend weeks rotating and revoking thousands of long-lived credentials, highlighting the monumental task and risks associated with static credentials.
After that incident, Rob and his team at the Financial Times used OIDC authentication where possible to make their CI/CD pipelines more secure and more manageable.
Introducing OIDC: A Better Alternative
OIDC, or Open ID Connect, provides a better approach to authentication and authorization, enabling short-lived authentication tokens. OIDC allows trusted systems, like GitHub Actions, to authenticate into other systems, such as Cloudsmith, using short-lived JWT tokens.
How does OIDC work with Github Actions and Cloudsmith?
The following diagram gives an overview of how GitHub's OIDC provider integrates with your workflows and Cloudsmith:
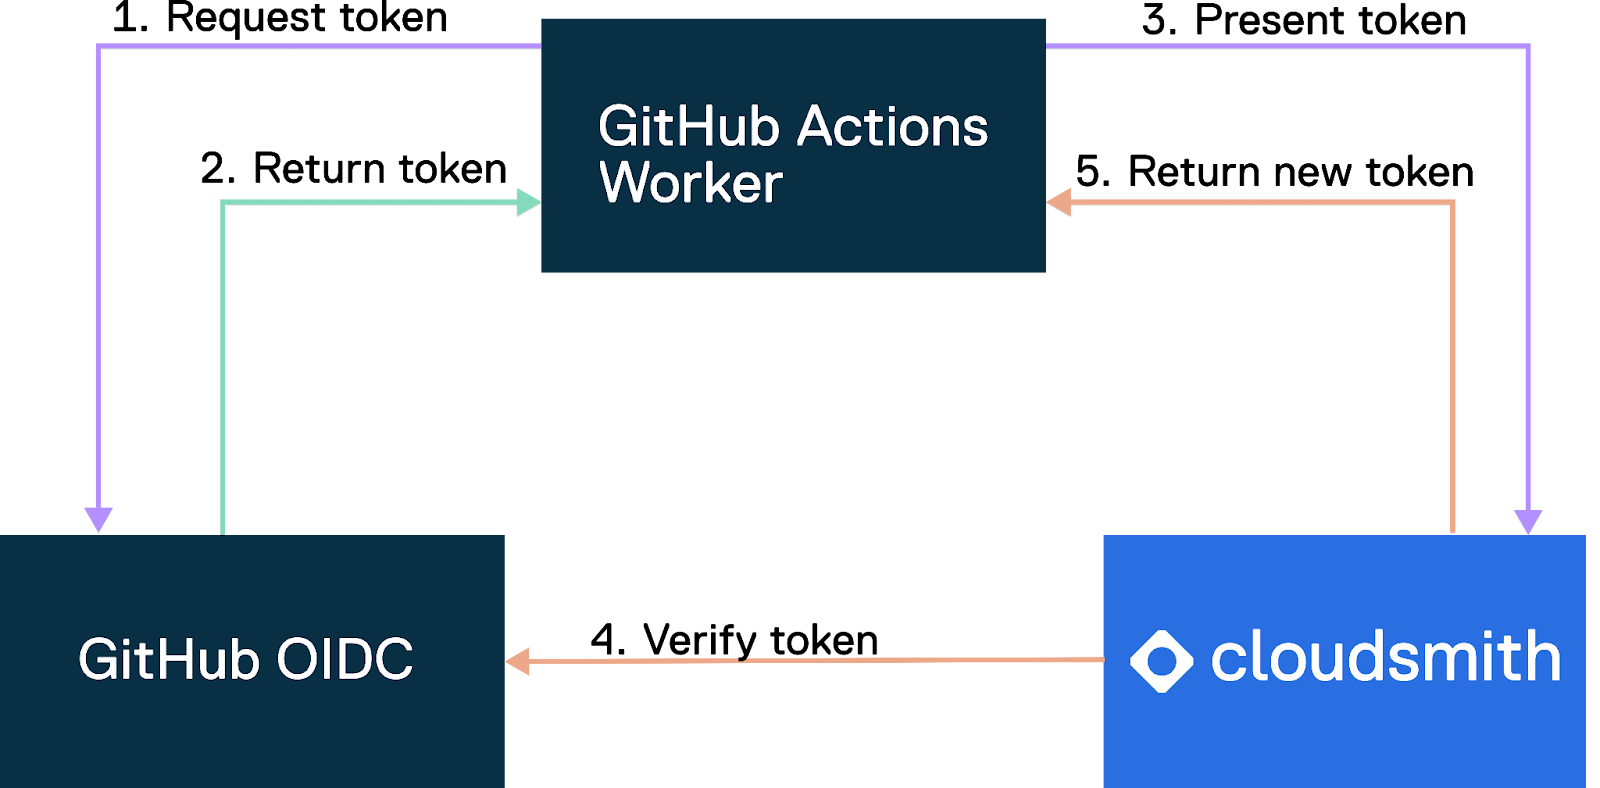
Prerequisite: Cloudsmith creates an OIDC trust relationship between your service account and your GitHub workflows that need access to Cloudsmith.
OIDC flow:
- Request token: Github Actions Worker initiates the workflow by requesting a token from the GitHub OIDC service to authenticate with Cloudsmith.
- Return token: GitHub OIDC service receives the token request. After verification and validation, it generates a JWT token. The GitHub OIDC service and the GitHub Actions Worker have implicit trust, allowing for this token exchange.
- Present token: GitHub Actions Worker presents a JWT token to Cloudsmith for access to resources.
- Verify token: Cloudsmith verifies the JWT token with the GithHub OIDC service to ensure its authenticity and validity. This step includes verifying claims.
- Return new token: Upon successful validation, Cloudsmith issues a short-lived access token to the GitHub Actions Worker, granting access to Cloudsmith's resources for around 90 mins to cover the duration of the job.
How OIDC Addresses the Security Risks Associated With Long-Lived Credentials
- Leakage Mitigation: OIDC tokens are short-lived and requested on demand, meaning that even if a token is leaked it will expire quickly (e.g., within 90 minutes), minimizing the risk of unauthorized access.
- Simplified Expiration Management: Since OIDC tokens are automatically generated and expire after a short period, there is no need to manage the renewal of static credentials across various workflows. This reduces the likelihood of workflow breakages due to expired credentials.
- Prevention of Credential Reuse: OIDC tokens are single-use, ensuring that the same token cannot be reused across different environments or workflows. This significantly lowers the risk of credential misuse.
Workflow Enhancement with OIDC, Cloudsmith, and GitHub Actions
Our workflow using GitHub Actions and Cloudsmith with OIDC will push a package to Cloudsmith from Github Actions using OIDC to authenticate.
Step-by-Step Guide
Follow the steps below for the Cloudsmith and Github Actions OIDC Setup:
- Create a Service Account in Cloudsmith.
- Set Access Controls.
Configure the repository access controls to allow the Service Account to push packages to Cloudsmith. - Configure GitHub OIDC in Cloudsmith:
- Navigate to the OIDC Provider Settings at: https://cloudsmith.io/orgs/{ACCOUNT}/settings/openid-connect/
- Click "Create" to open the Edit Provider Settings form.
- Fill in the OIDC form:
- The Provider Name is a Unique name for the provider.
- The Provider URL is unique to each provider, for Github Actions it is: https://token.actions.githubusercontent.com
- Set at least one claim in the Required OpenID Token Claims field. For example, set
repository_owneras a claim. Other supported claims can be found here. - The service accounts that the user wants to be able to authenticate as with the configured provider & claims combination
- Set Permissions in GitHub Actions.
- Open your GitHub Actions YAML file which sets up your Github Actions workflow.
- Add the permissions setting to request the JWT:
Permissions: id-token: write # This is required for requesting the JWT contents: read # This is required for actions/checkout
- Generate the OIDC Token in GitHub Actions.
- In your GitHub Actions YAML file generate a token in Github Actions you can use getIDToken() or you can use the curl command below to request the JWT.
curl -H "Authorization: bearer $ACTIONS_ID_TOKEN_REQUEST_TOKEN" "$ACTIONS_ID_TOKEN_REQUEST_URL&audience=api://AzureADTokenExchange"
- In your GitHub Actions YAML file generate a token in Github Actions you can use getIDToken() or you can use the curl command below to request the JWT.
- Make a POST request in GitHub Actions to the Cloudsmith.
- Make a POST request in your GitHub Actions YAML file to the Cloudsmith OpenID endpoint to receive the JWT token:
curl -X POST -H "Content-Type: application/json" -d "{"oidc_token":$value, "service_slug":"SERVICE_ACCOUNT_SLUG"}" https://api.cloudsmith.io/openid/{ACCOUNT}/
- Make a POST request in your GitHub Actions YAML file to the Cloudsmith OpenID endpoint to receive the JWT token:
- Use the JWT token in GitHub Actions like an API key with Cloudsmith:
- The JWT token generated by the OIDC endpoint can be used like an API key: X-Api-Key header: "X-Api-Key:Bearer OIDC_TOKEN"
- This token will also, work with the Command-Line Interface when specified as CLOUDSMITH_API_KEY
- Trigger a build in GitHub Actions, and OIDC will authenticate into Cloudsmith.
For a more detailed set of instructions, go to our documentation.
In this blog, we outlined how to enhance your GitHub Actions workflow's security by eliminating the need to store Cloudsmith credentials in your repository and leveraging OIDC for authentication.
If this was useful, don’t miss our next webinar on enhancing your infrastructure as code workflows with Spacelift!
Liked this article? Don\'t be selfish (:-), share with others: Tweet